Welcome to Objects and Order Digital Exhibitions! This guide will help you get started.
- Have a question? Send it along using the Get in touch tab at right.
- You can navigate to a section by clicking a topic from the list.
- Check out the handy glossary of terms.
Step 1: Visit the MOON Dashboard
If you’re new to Objects and Order, you’ll begin with a welcome slideshow. Below it, click Continue to MOON to go to the Dashboard.
If you're returning to the site, from the Objects and Order homepage, click Dashboard in the menu. If Dashboard doesn't appear as a menu option, please Sign In.
In the MOON Dashboard, you’ll see the a Base with your name, to which you have been added as a member. A Base is a collaborative space for organizing collection objects and creating digital content. This Base has 2 members: Christa (Base Owner) and you.
Double click to open.
Step 2: Explore the Testing or Preview Base
If you haven't yet explored the object system, take a moment to get acclimated.
Tip: You can select your preference for Light Mode or Dark Mode by clicking the circular profile icon in the upper right-hand corner.
Objects
You’ll start on the Objects page with 24 objects. These are the objects in our sample exhibition called Over the Moon.
(We’re always grateful for Open Access and Open Content images and to the museums and organizations that make so many of their collection images available for use.)

Double-click to open an object and check out the data. Let’s start with Keelmen Heaving in Coals by Moonlight. The form fields you see are related to the sample exhibition.
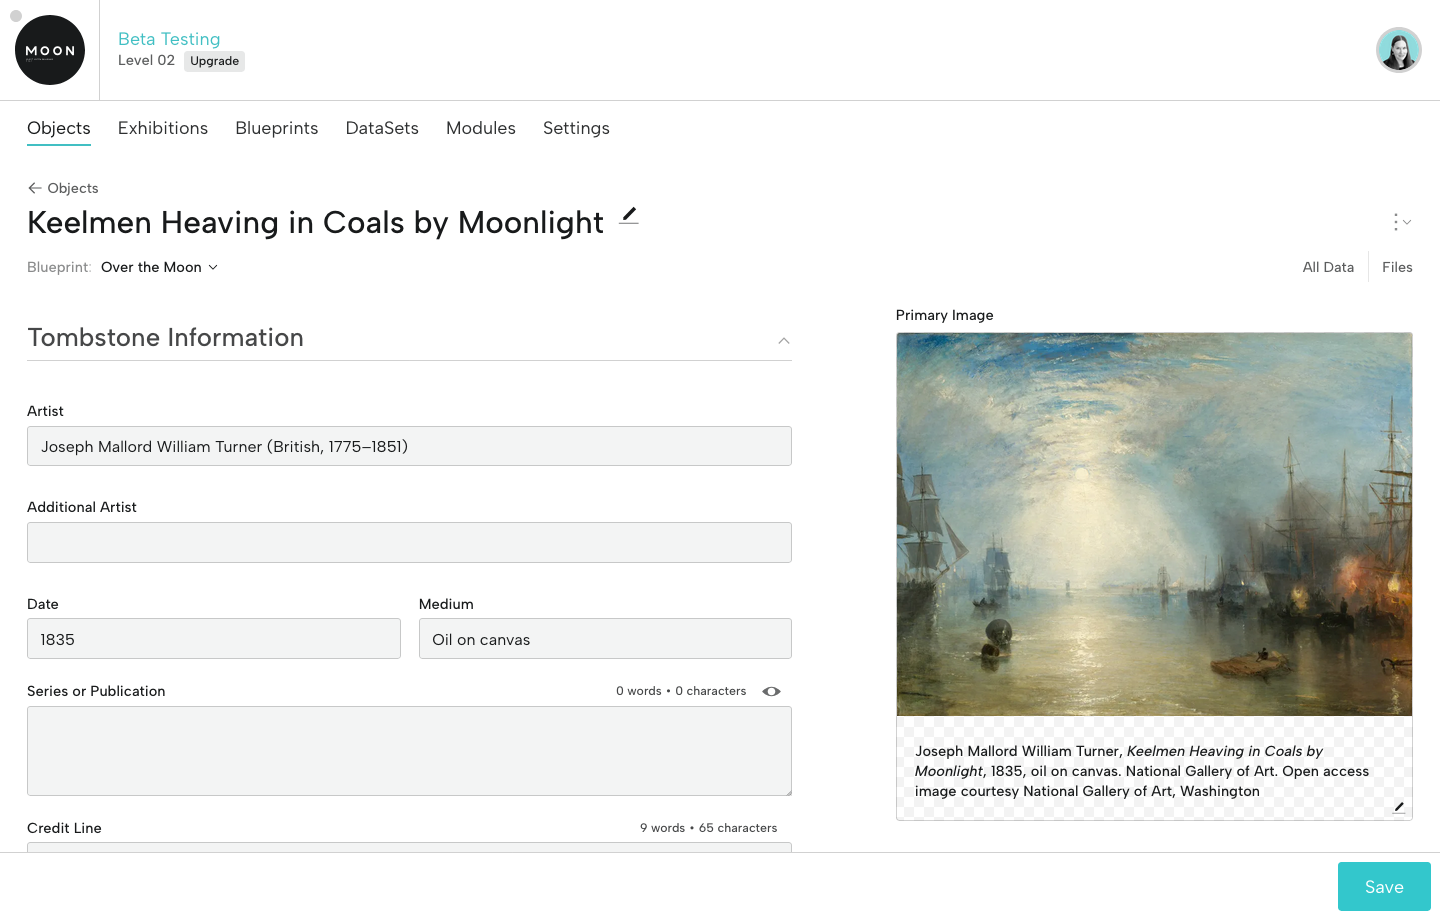
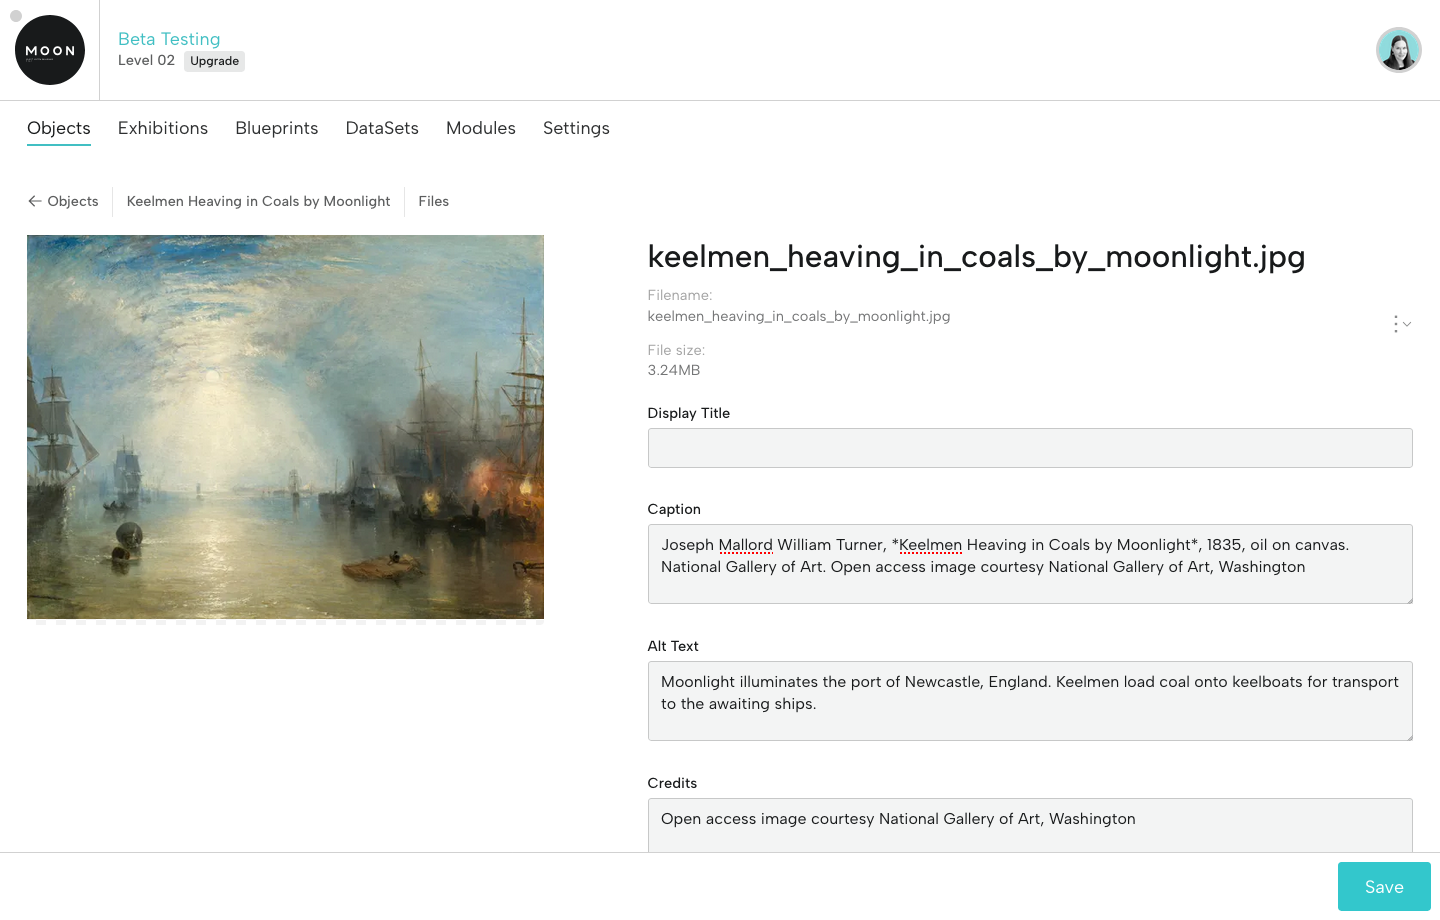
Take a look at the Files on the right. Click a file to see its metadata, including caption, alt text, and rights information. Object files (image, audio, and video), captions, and alt text will be available for use within the exhibition.
Blueprints
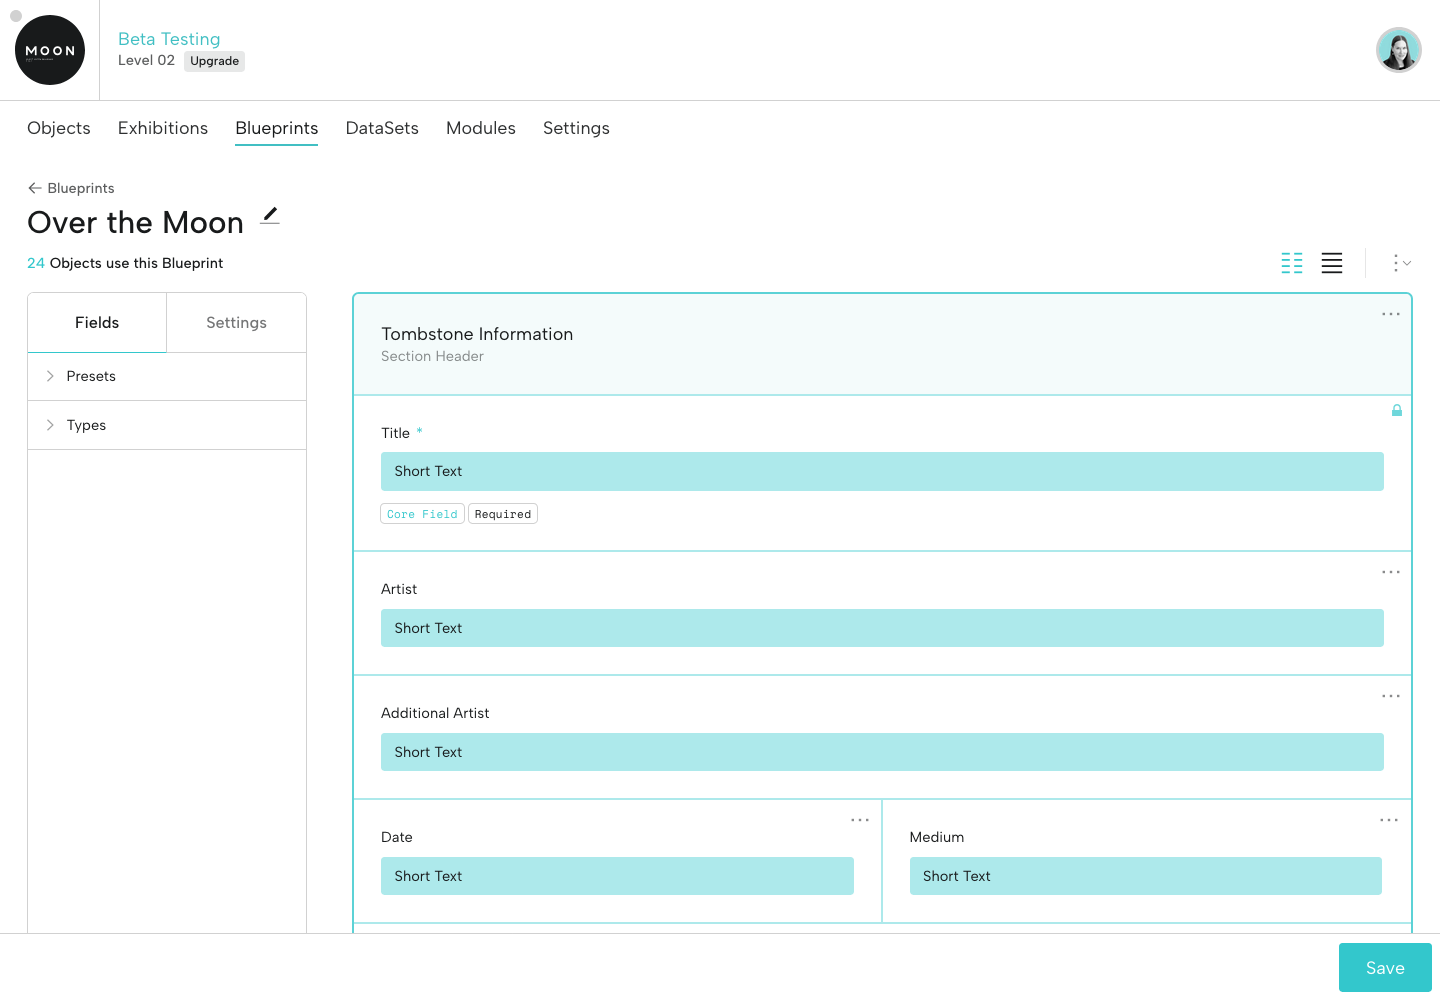
Information fields for objects are generated by Blueprints, which are custom forms for object types, projects, and groups.
Click Blueprints from the menu, then on Over the Moon, which is an Exhibition Blueprint. We customized it for our sample digital exhibition, so it has fields for tombstone info, label text, and media files. This is the primary Blueprint for all the objects in this Base.
FYI: Blueprints aren't for adding object information, they're for adding and organizing form fields (for example, Date or Credit Line). Data for an individual object is added on that object's page in the form fields generated by the Blueprint.
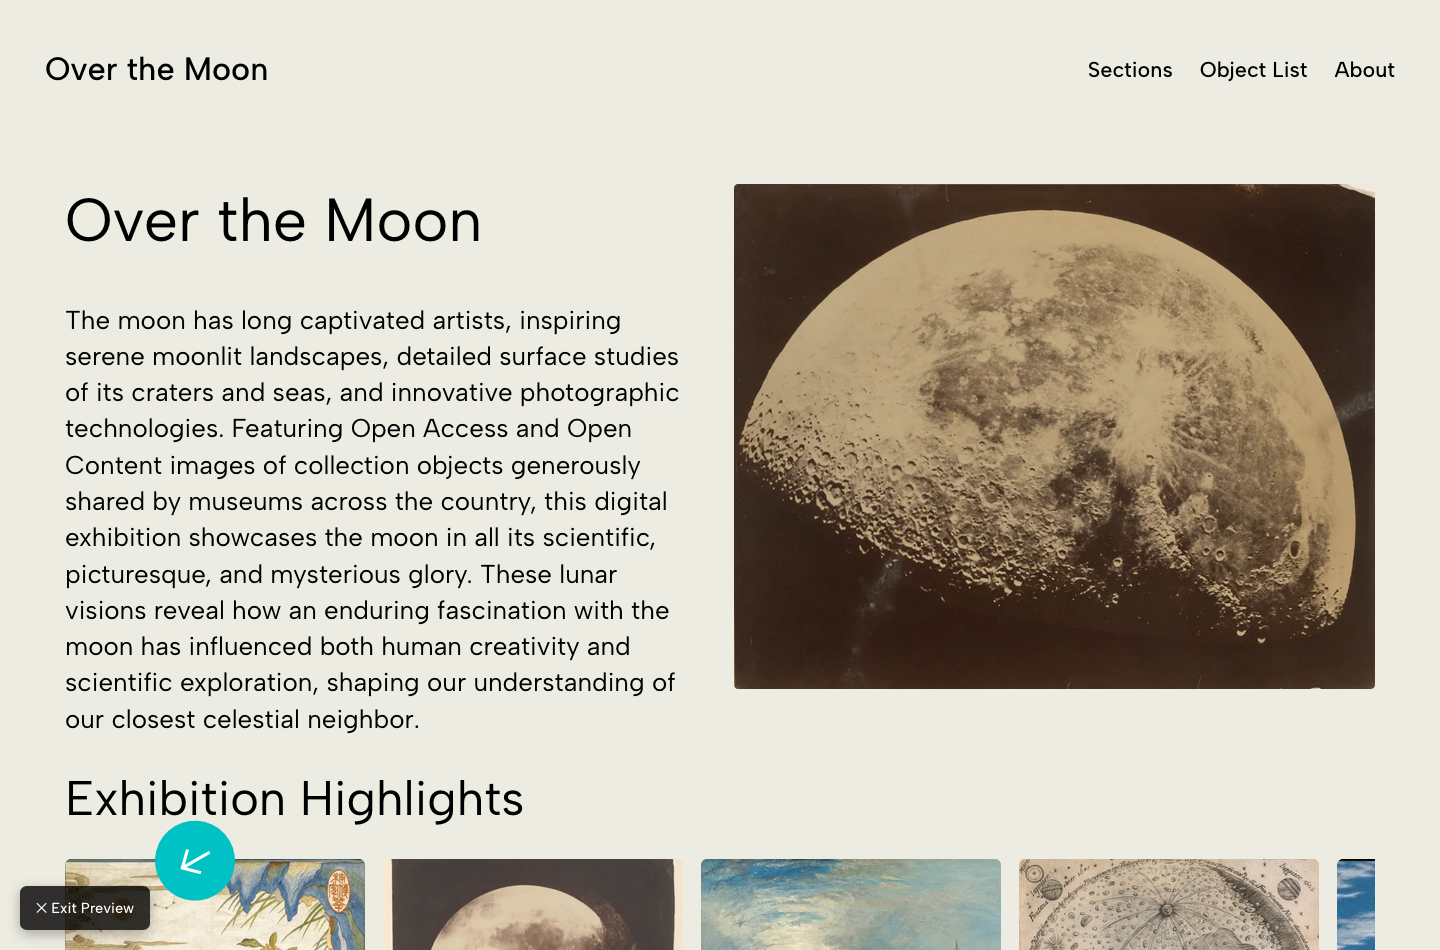
Step 3: Explore the Over the Moon Exhibition
Click Exhibitions from the menu. You'll see one exhibition: Over the Moon. Click it.
The first thing you’ll see is the Exhibition Builder, comprised of the Editor (left) and Viewer (right). Displayed in the Viewer, you’ll see the home page of a sample exhibition.
Please Note: The design of the sample exhibition for our testers varies, so your version may look different than the screenshots below.
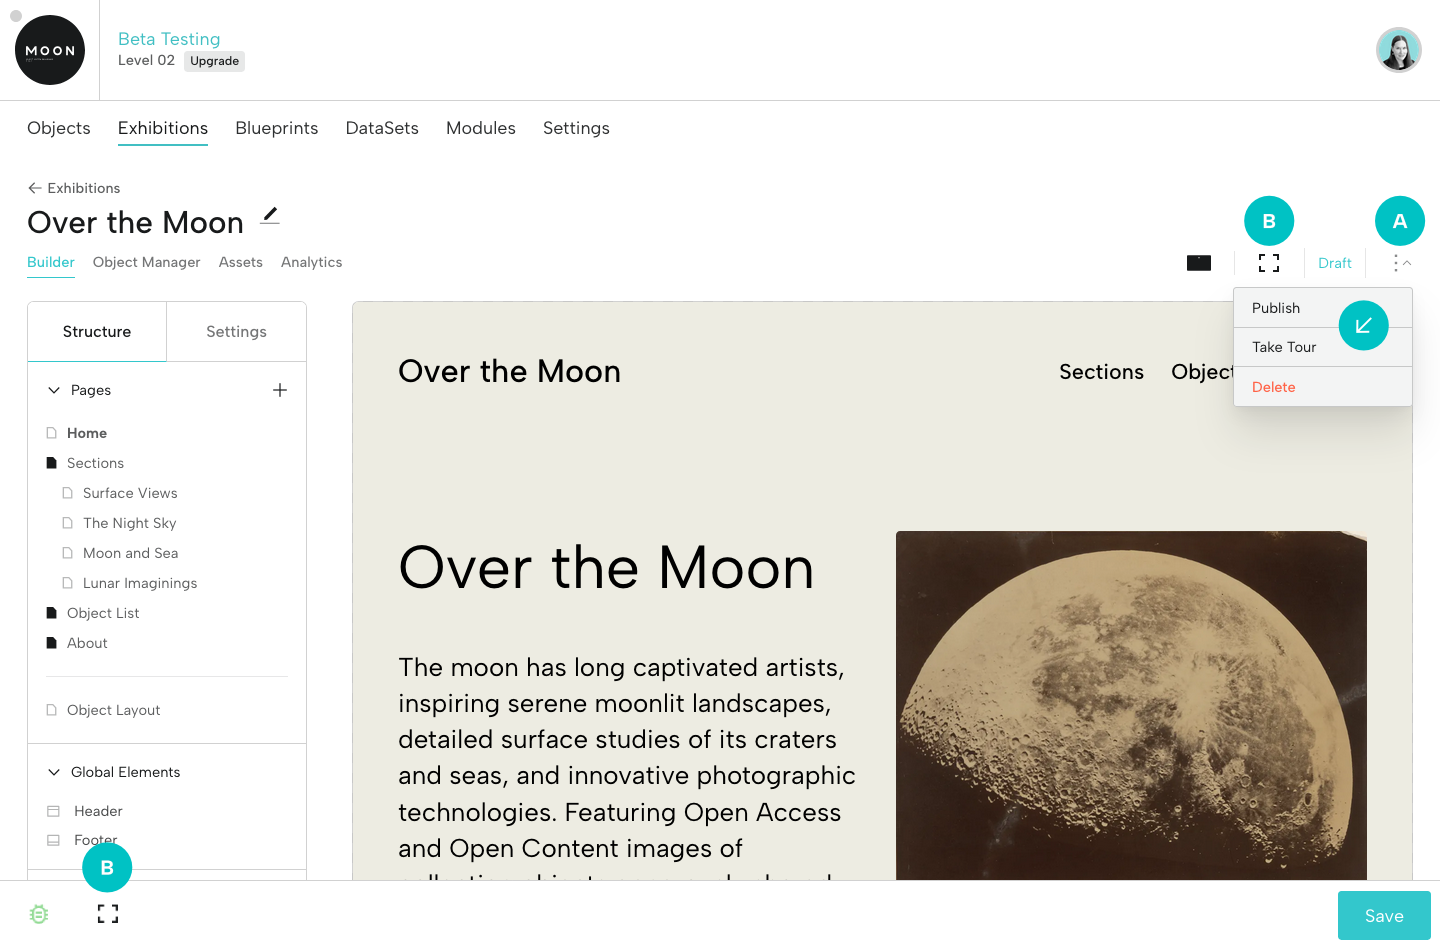
A. Using the drop-down menu at right, click Take Tour to acclimate yourself with the UI elements. There are 11 stops on the tour and you can re-take it anytime.
B. Click the full-screen icon at upper right or lower left to view and explore the exhibition in Preview Mode (this turns off editing).
Navigate the exhibition using the menu. Check out the sections and click on a few of the objects. Take a look at the Object List.
Then, in the lower left corner, click Exit Preview.
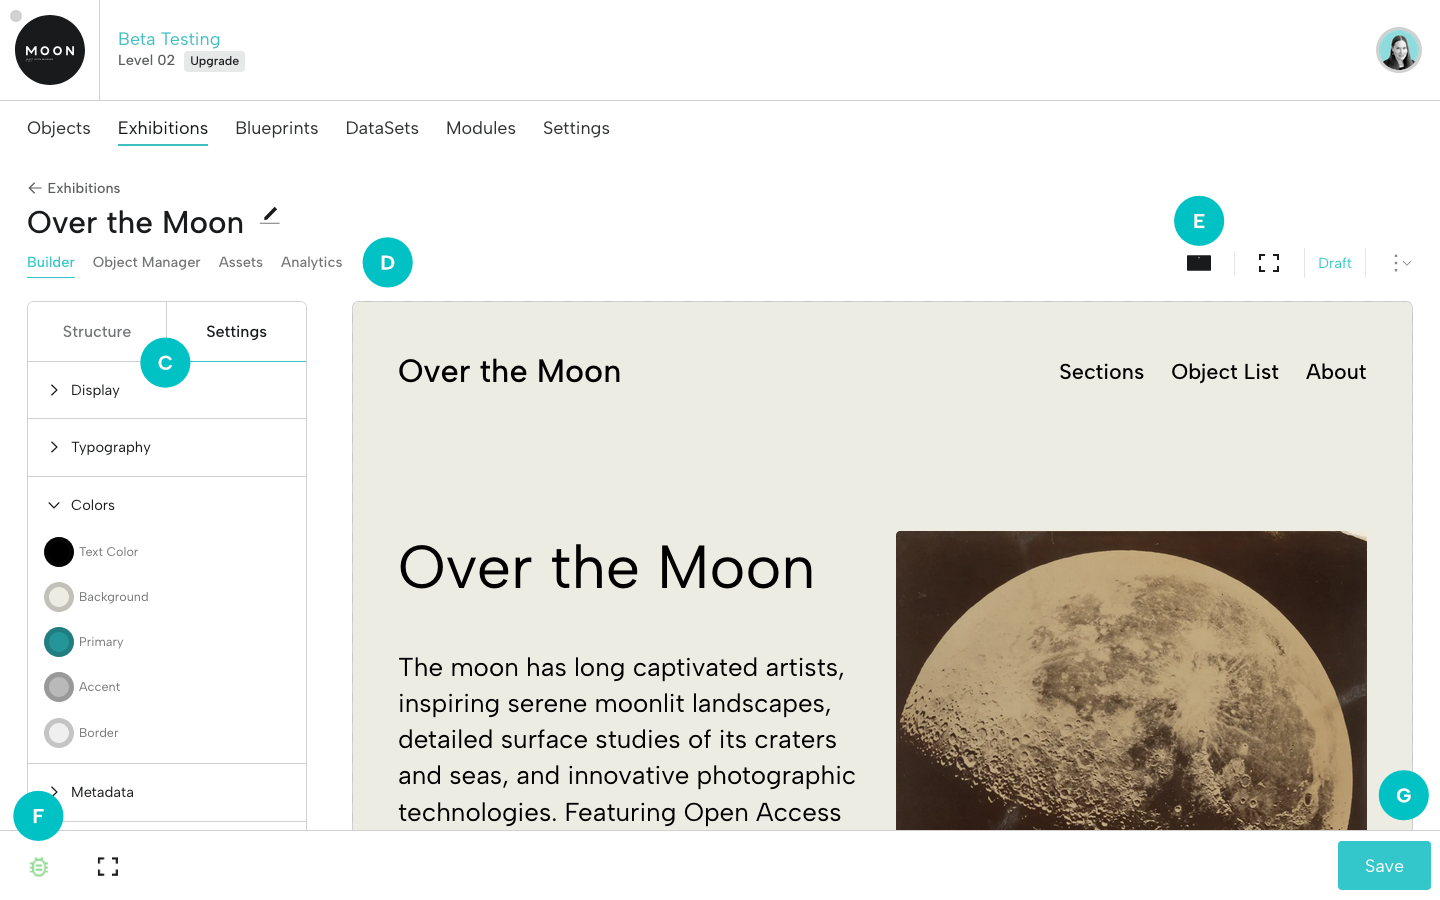
C. At left, explore the Structure tab, with all the exhibition pages (these can be dragged and dropped to reorder), and the Settings tab, where you’ll see options related to Display, Typography, Colors, and Metadata.
D. Check out the menu below the exhibition's title. Click the Object Manager to see the objects in each exhibition section (these can be dragged and dropped to reorder). Click Assets to view other files added for the exhibition (museum logo, title treatment, sponsor logos, etc.). Select a file to see its metadata. Analytics is coming soon.
E. Toggle on Mobile View, then click again to go back to Desktop View.
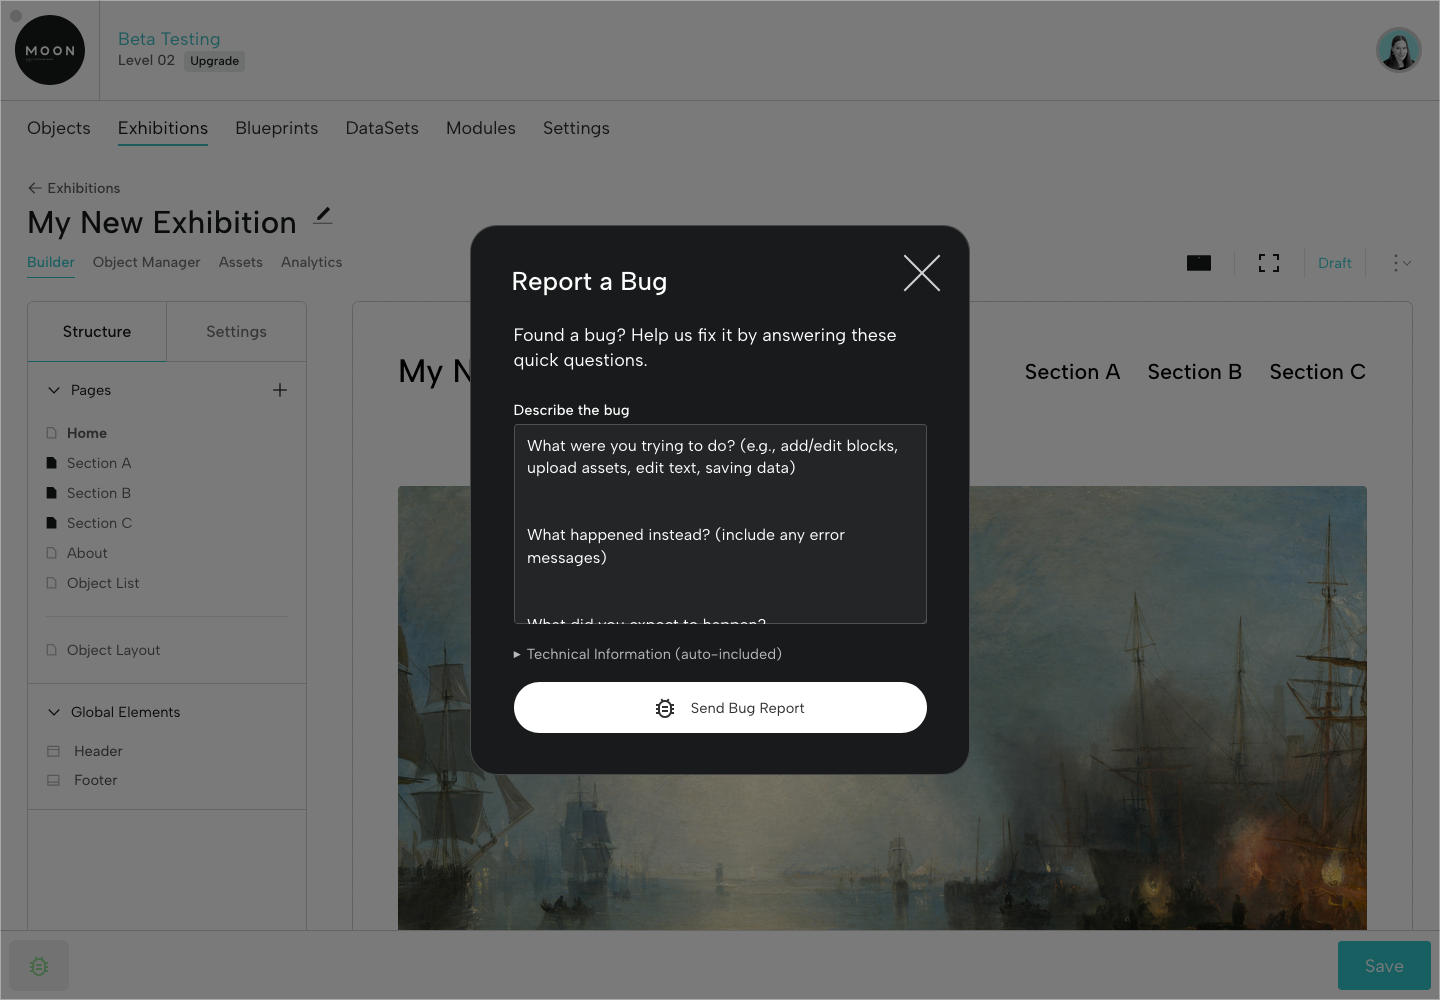
F. If you notice a bug, you can submit a Bug Report by clicking the green bug at lower left.
G. Save any changes.
If you’d like to make any adjustments to the sample exhibition, feel free to edit, update, and save changes (you may want to read through the rest of the guide first).
Step 4: Create A New Exhibition
Ready to create an exhibition? Go to Exhibitions in the menu, then click the + icon at upper right. Follow the steps to set up your own sample exhibition.
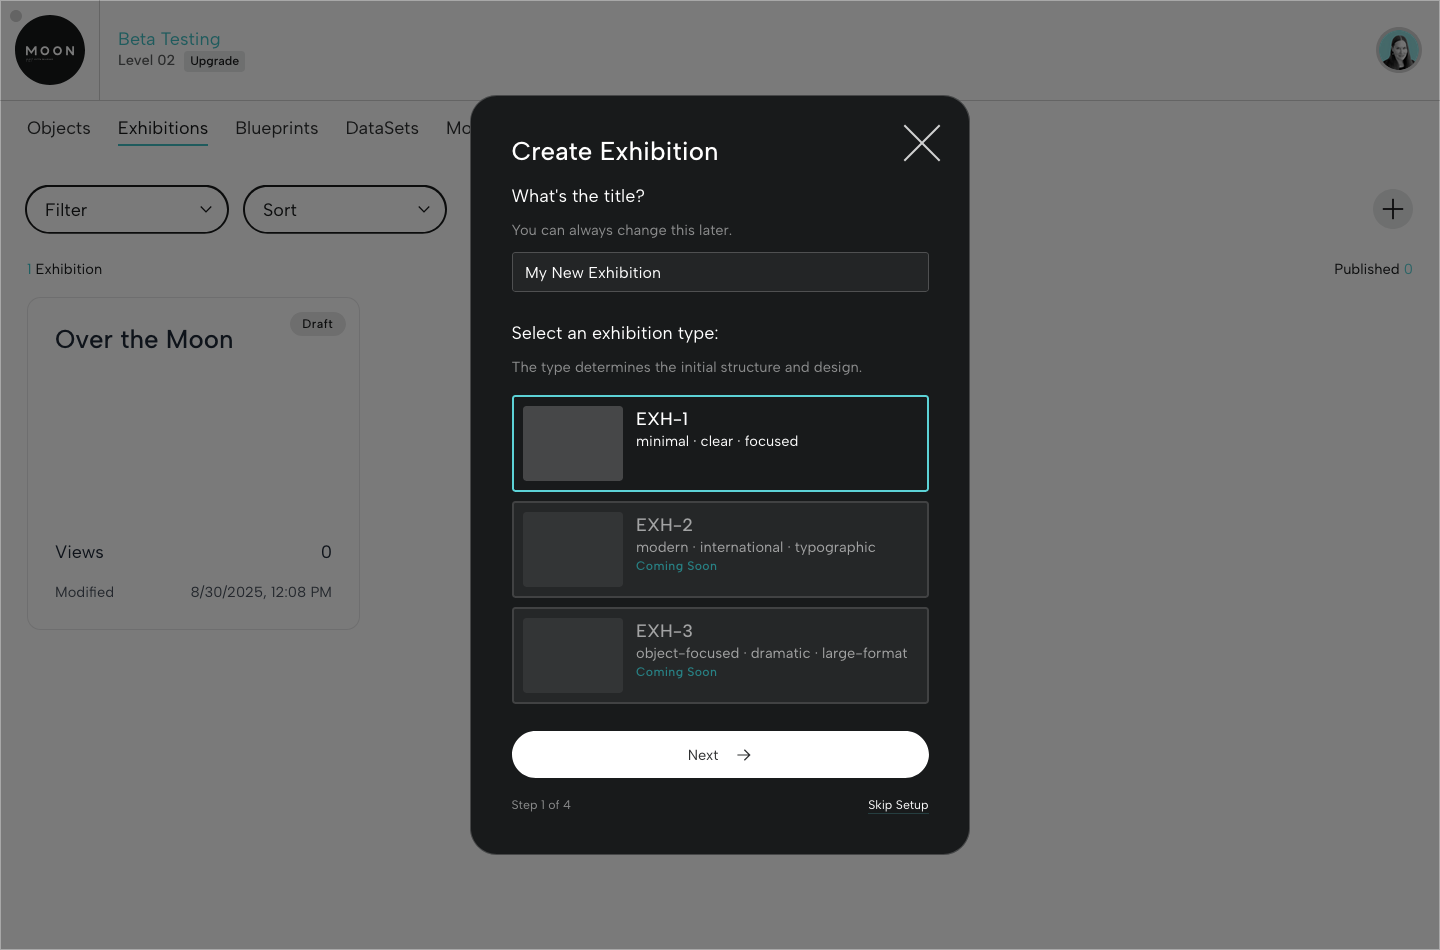
Step 1 of 4: Add your title and select an exhibition type (when choosing a type, consider the general vibe of the project). Currently, EXH-1 is the only available type. We may add more exhibition types during the testing period.
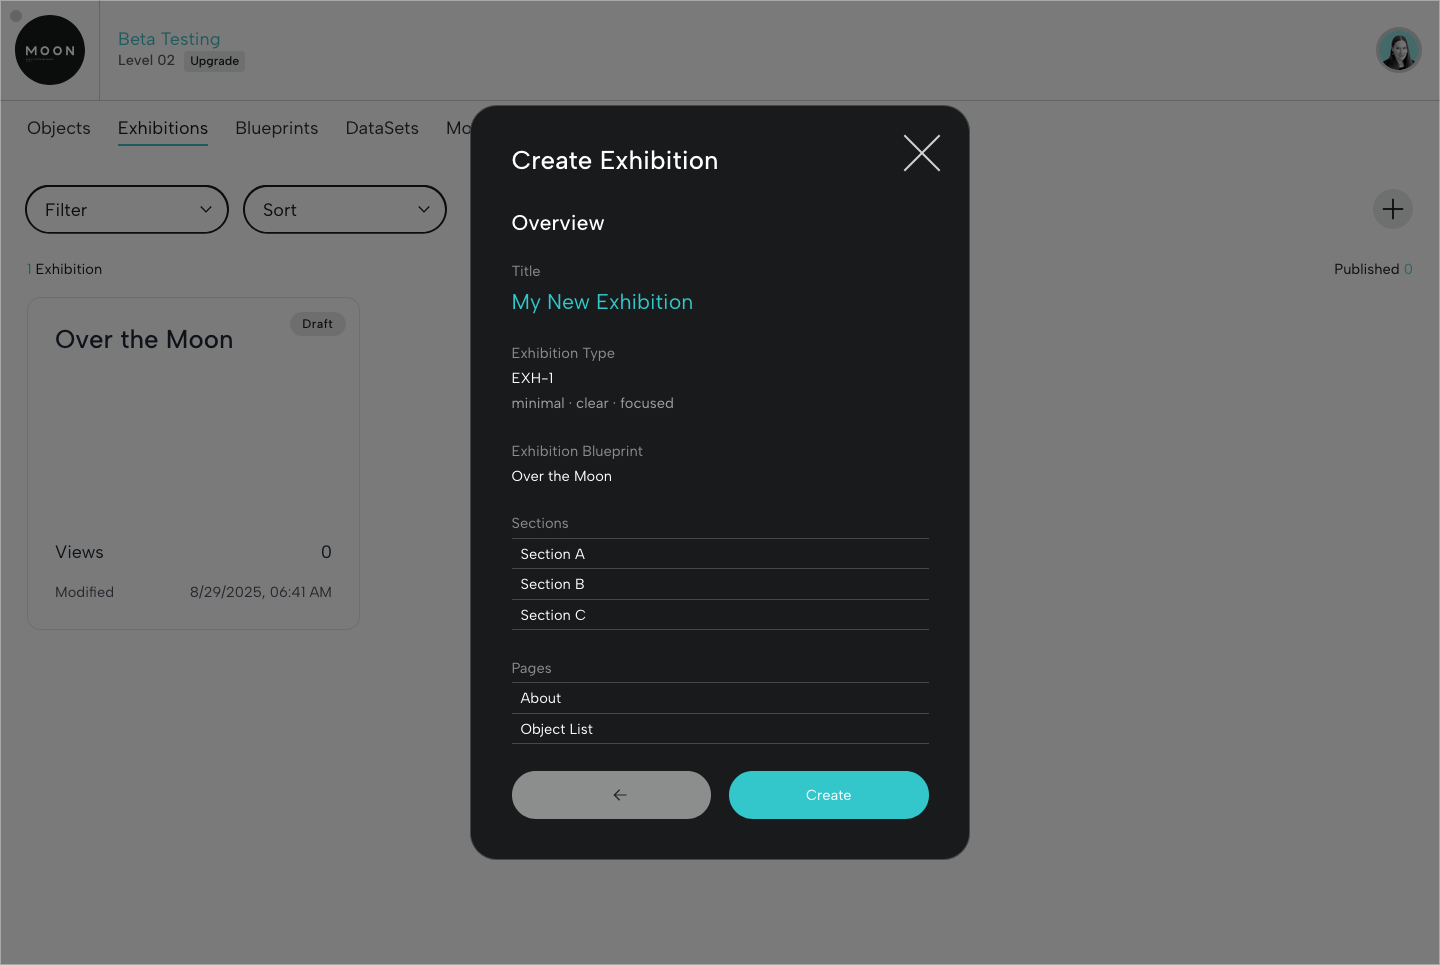
Step 2 of 4: Select Over the Moon as your Blueprint. This will make 24 sample objects available in the exhibition.
Step 3 of 4: Add a few sample section names (for example, Section 1, My New Section, etc.); you can change these later.
Step 4 of 4: Add additional pages (you can change these names and add other pages later).
Review your exhibition information and click Create.
Step 5: Review the Structure and Update Settings
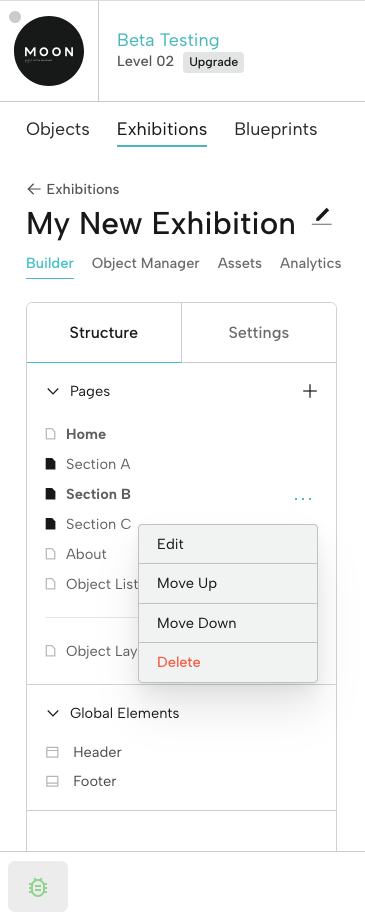
At left, in the Structure tab, under Pages, you’ll see all the pages you added, including your Sections. If you need to reorder pages, just drag and drop.
Click the page icon to the left of the page name to display it in the menu (you’ll notice that Section pages are displayed by default). When you hover over a page, a menu icon (…) appears at right that allows you to edit, move, or delete it.
Advanced: You can also add sub-pages. For example, you might add a Sections page (type: Content Page), and then make Sections A, B, and C sub-pages by dragging them below Sections (sub-pages will display a dash). In this example, you could click the page icon for the Sections page, and then your sections would display as a drop-down from the exhibition menu.
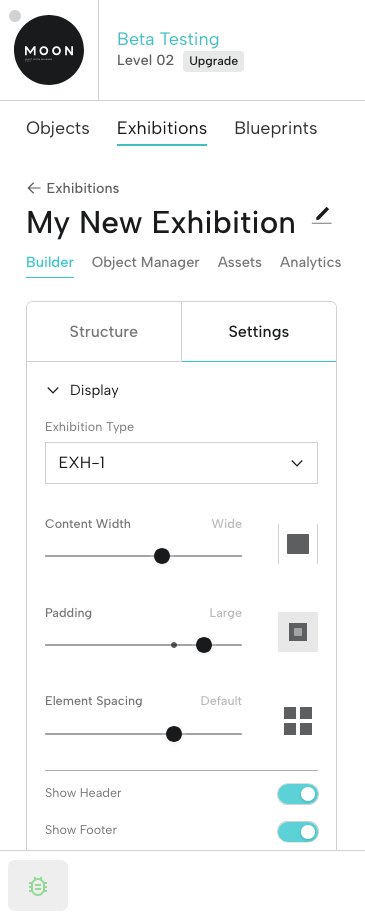
Click the Settings tab to explore and update Display, Typography, Color, and Metadata options. The choices you make in Settings will apply to every page across your exhibition (however, you can still make updates on individual pages to override these choices).
Step 6: Customize Pages with Blocks
Let’s start customizing the Home page.
Every page is comprised of elements called Blocks. There are Blocks for headings, text, single images, groups of images, audio files, videos, etc. We'll start by looking at two types of Blocks.
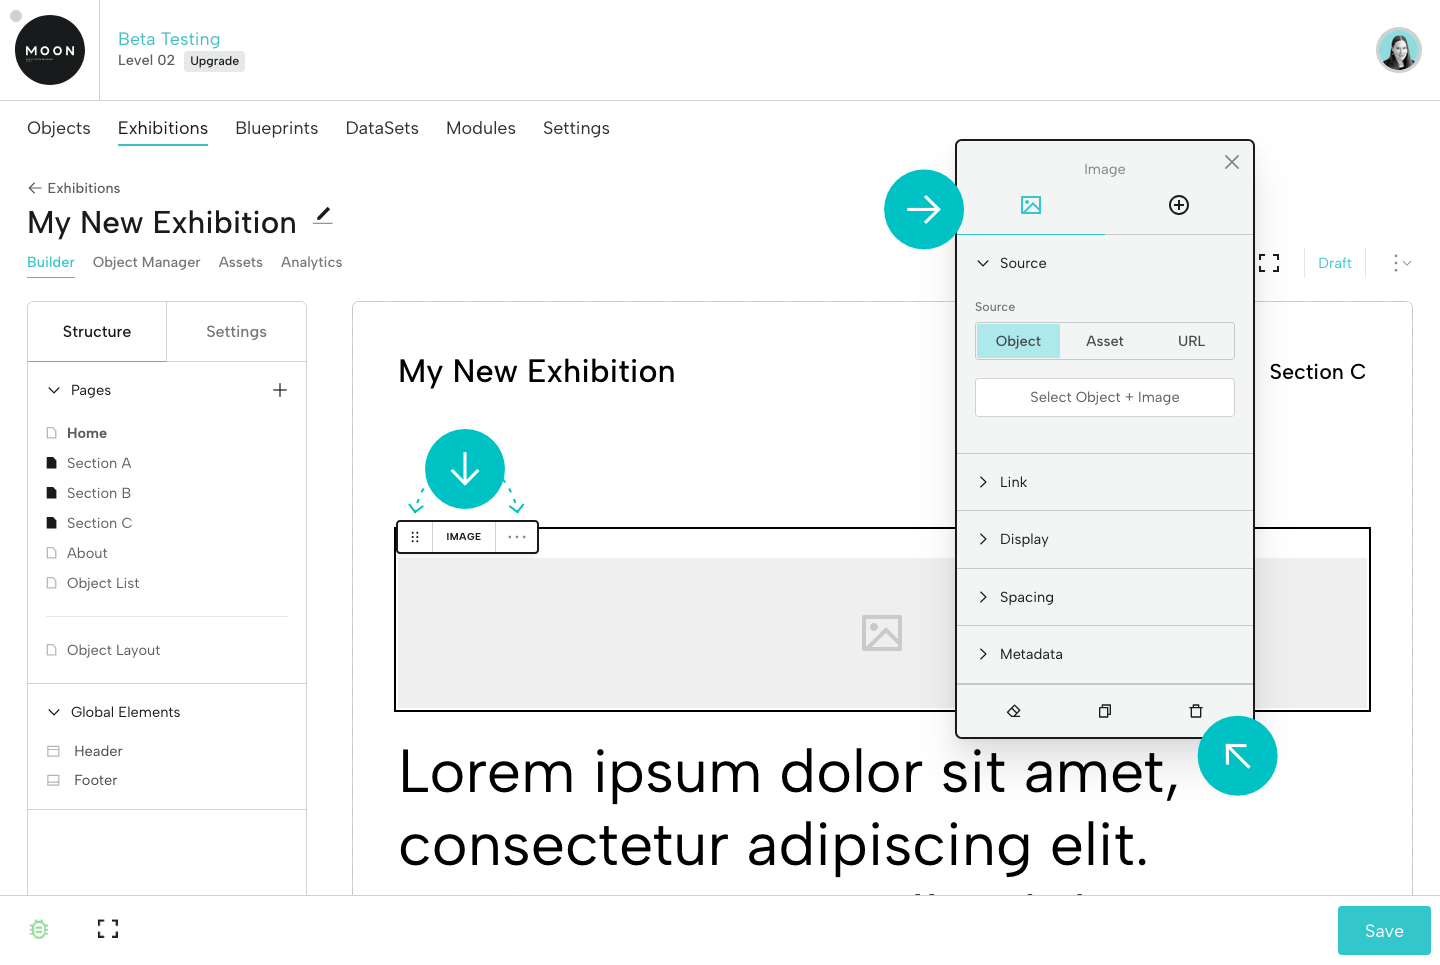
A. Click the image placeholder.
B. Two items will appear in the Viewer:
In the upper left-hand corner of the Block, you’ll see the Block Bar. The Block Bar lets you drag the block (six dots, at left) and move, duplicate, or delete the block (menu indicated by three dots, at right).
At right, you’ll see the Universal Editor. It allows you to adjust and style the block. You’ll have different options for each block type to help you customize the display. You can position the Universal Editor wherever you like.
To delete a Block, use the ... menu in the Block Bar or click the trash can icon in the bottom right of the Universal Editor.
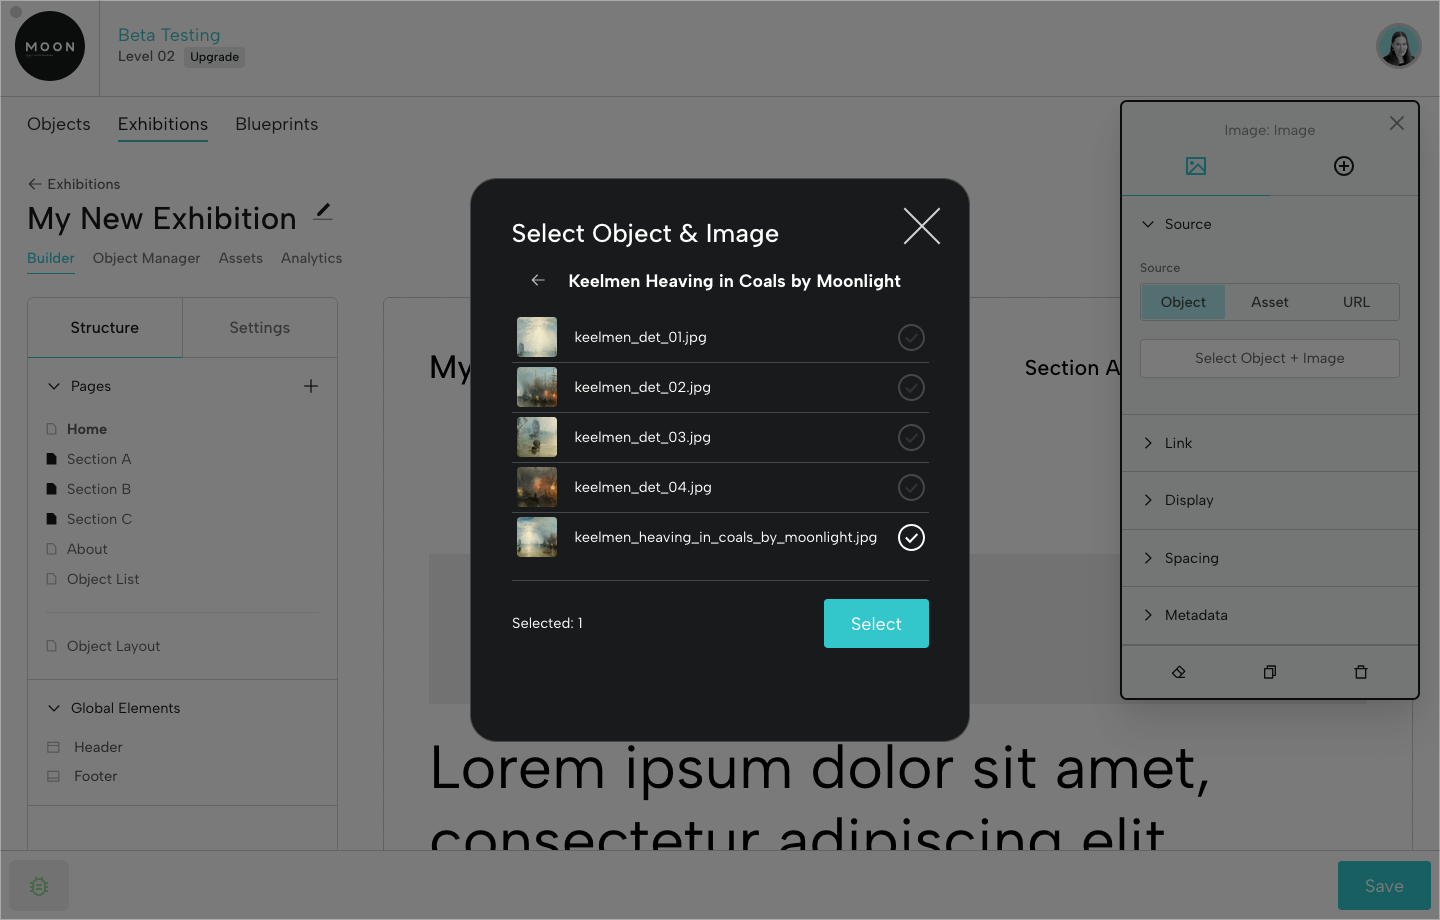
C. In the Universal Editor, you’ll see three options for choosing the source for your home page image. Let’s select Object, then click Select Object + Image.
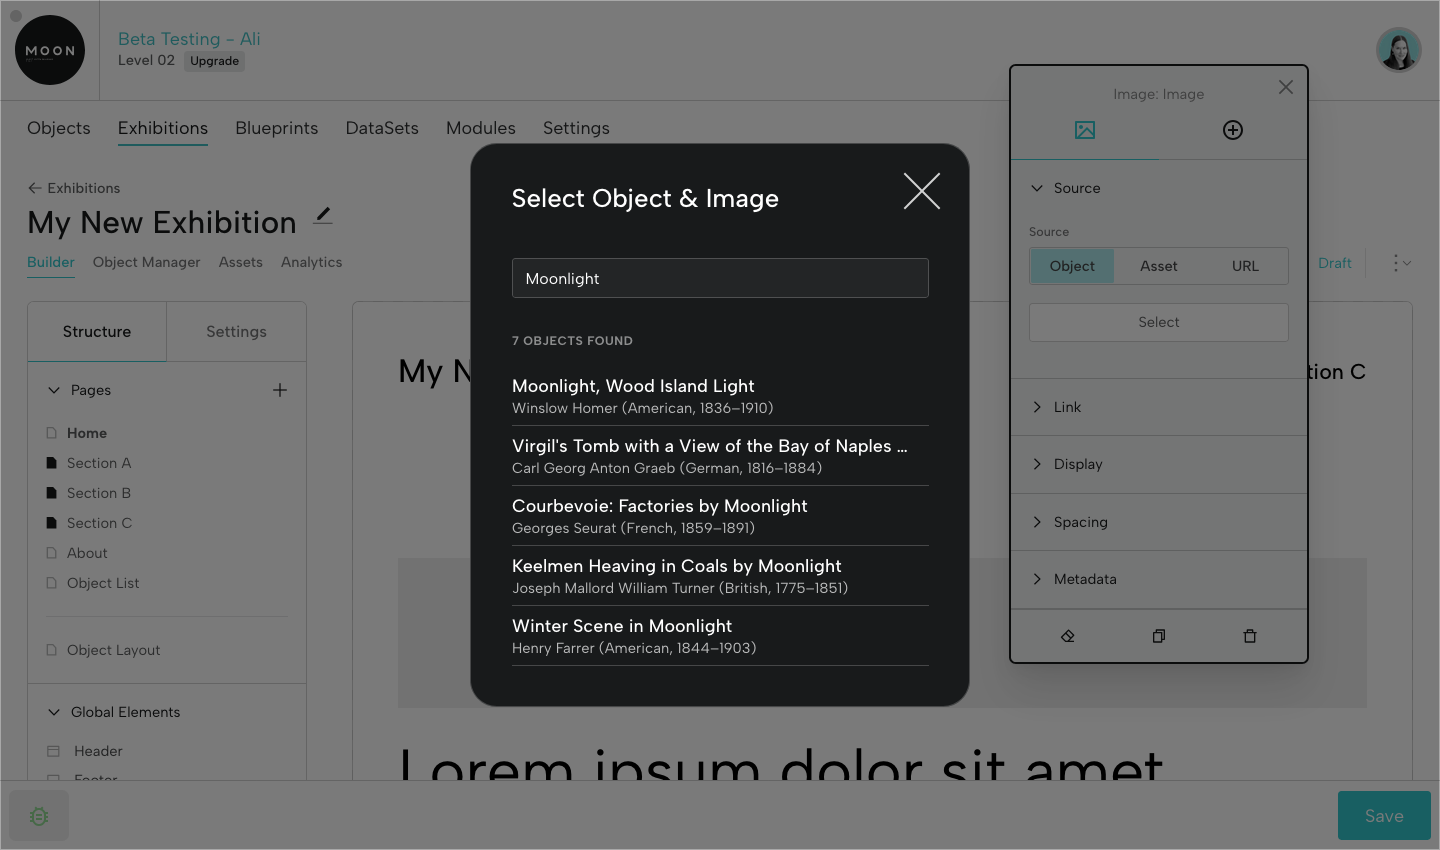
Search the word “Moonlight,” scroll the list, and select an option. Once you choose an object, you’ll select the image by clicking the check mark at right, then Select.
D. Move the slider for Image Quality all the way to the right (Original).
E. Check out the range of options in the Display and Spacing tabs. In Display, try toggling on Full Width Breakout to resize the image.
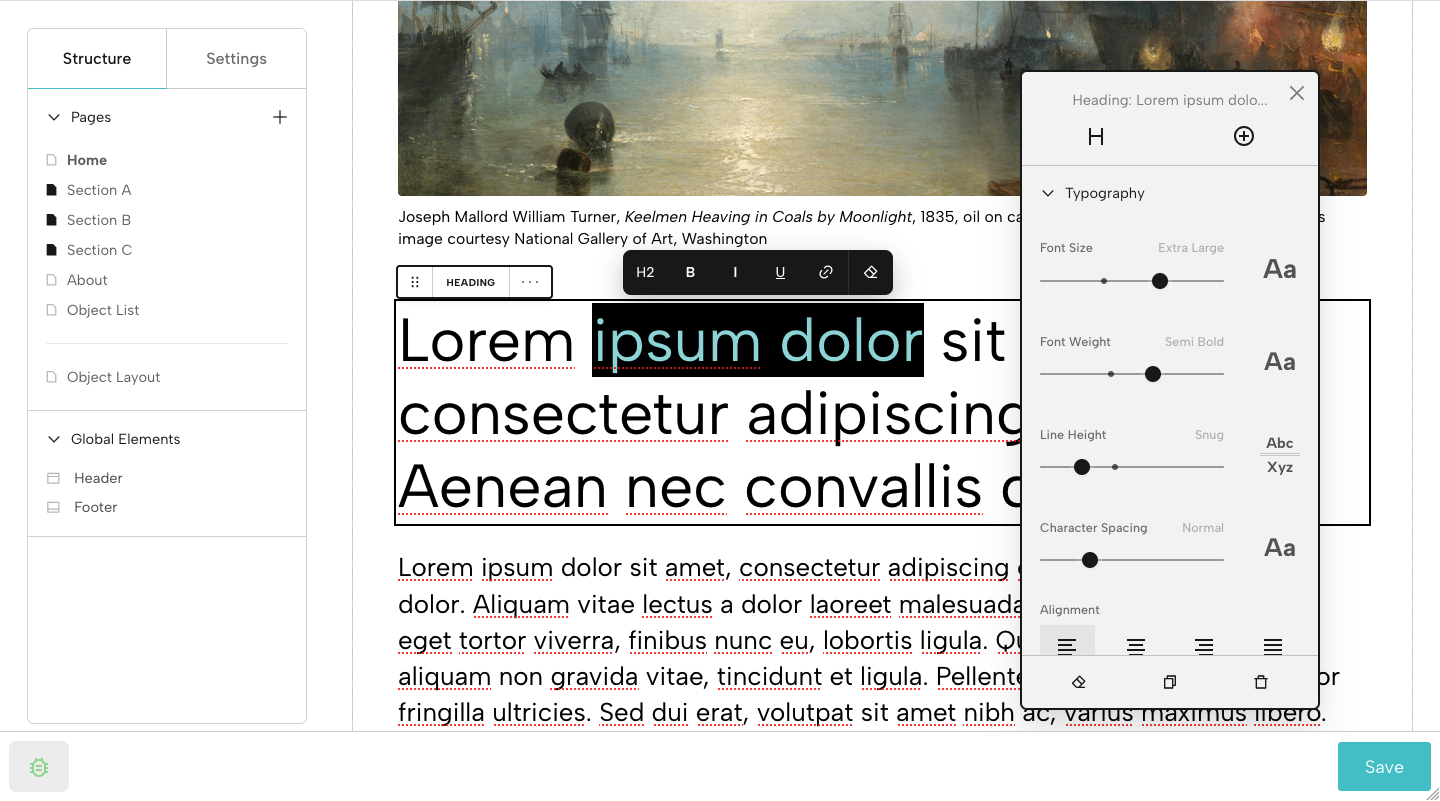
F. Now that you’ve added an image, click the placeholder heading below it. You can replace or delete this text. Select a portion of the text to add italics, bold, or underline, or to format as an H2, H3, or H4.
G. Notice the Universal Editor has changed and now offers options for editing the Heading Block. Now you have options for Typography, Colors, and Spacing.
H. Save your changes.
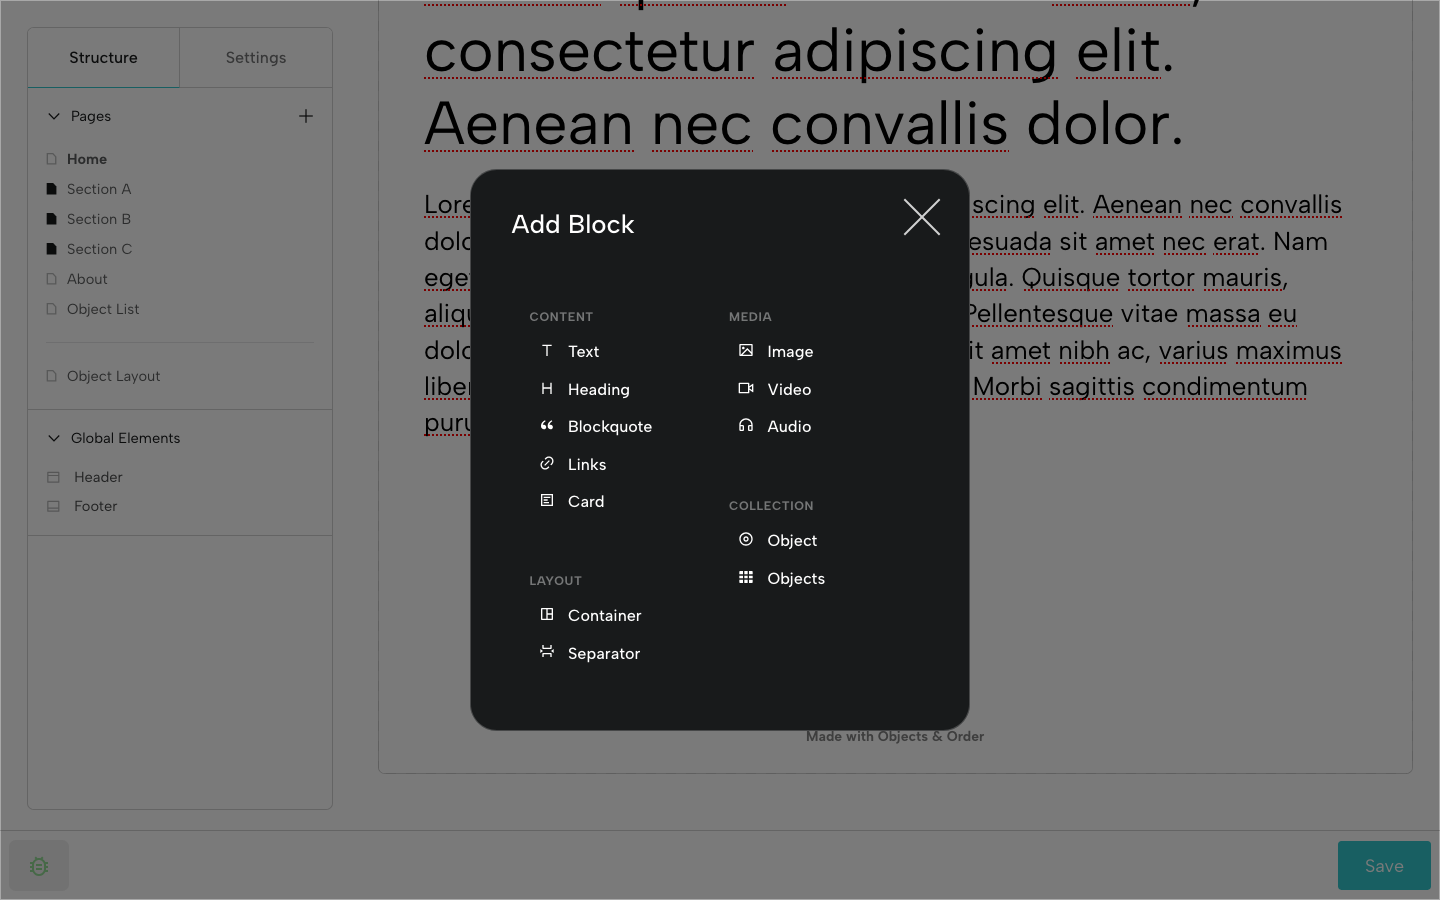
I. To add a new Block, click the + icon towards the bottom of the page and choose a type. Try adding a few different types and check out the Universal Editor options for each of them.
To move or duplicate a block, use the ... menu in the Block Bar (right side). Another option for moving the block is to use the dragger (six dots) in the Block Bar (left side).
To delete a block, use the ... menu in the Block Bar (right side) or click the trash can icon in the bottom right of the Universal Editor.
Step 7: Manage Objects in the Object Manager
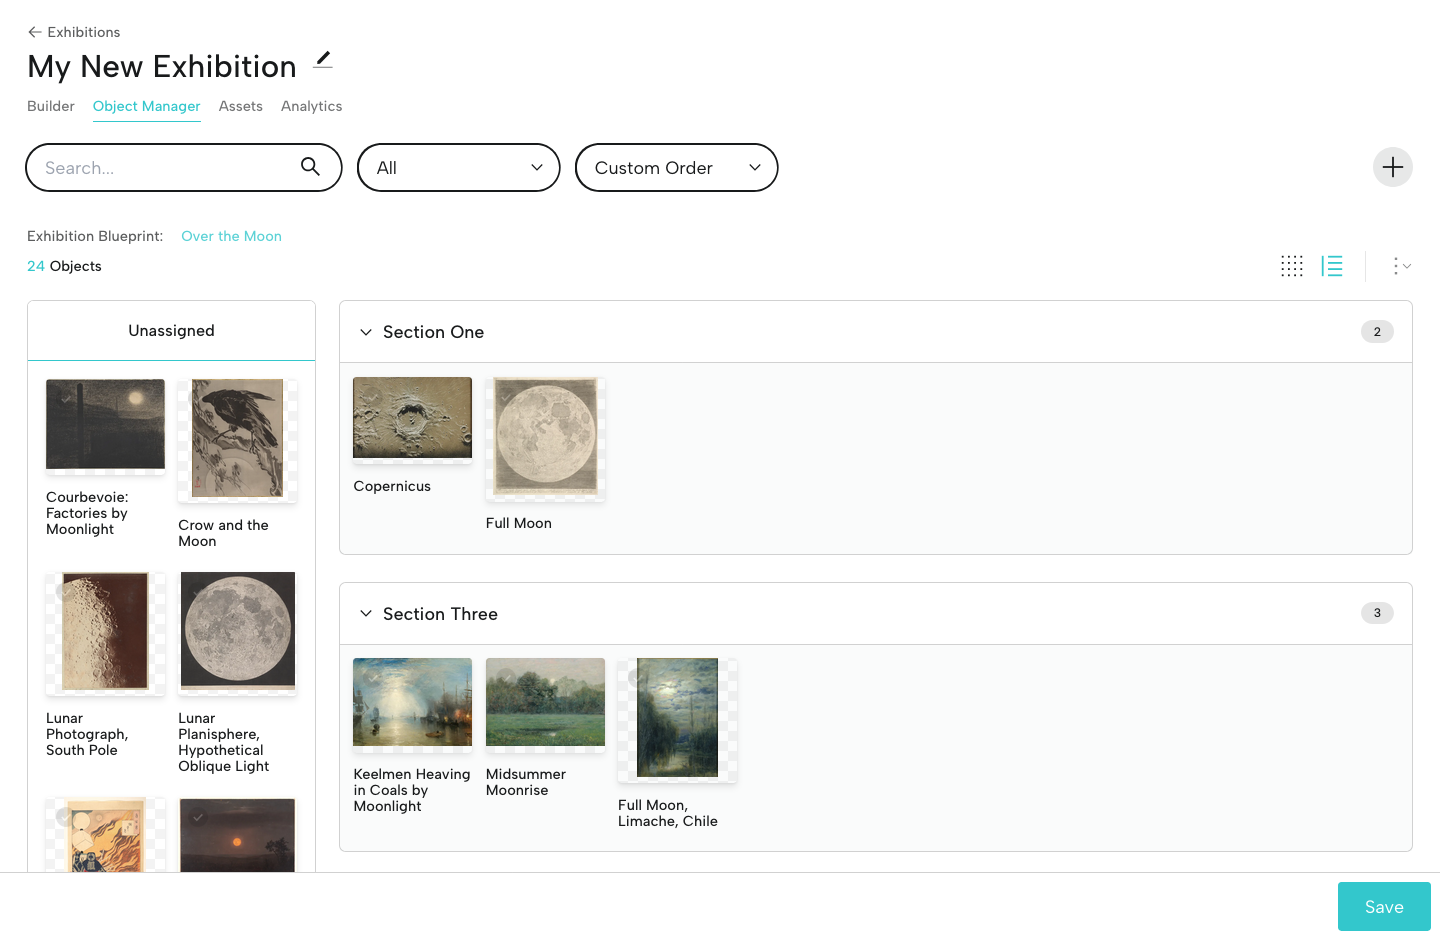
Visit the Object Manager (in the menu below the exhibition title).
At left, you’ll see the 24 sample exhibition images, and at right, the sections you created. Drag and drop images into your sections, and reorder them as necessary. Save when you’re finished. You can always come back to the Object Manager if you want to make updates.
If you need to edit any object data, you can click on the title of the object in the Object Manager to go directly to that object's page.
Step 8: Adjust Object Layout
Let’s go back to the Builder (in the menu below the exhibition title), then to the Structure tab at left, and select Object Layout.
This is where you’ll set up the display format to be used for every single exhibition object. Think of this as a template for displaying object information and media files.
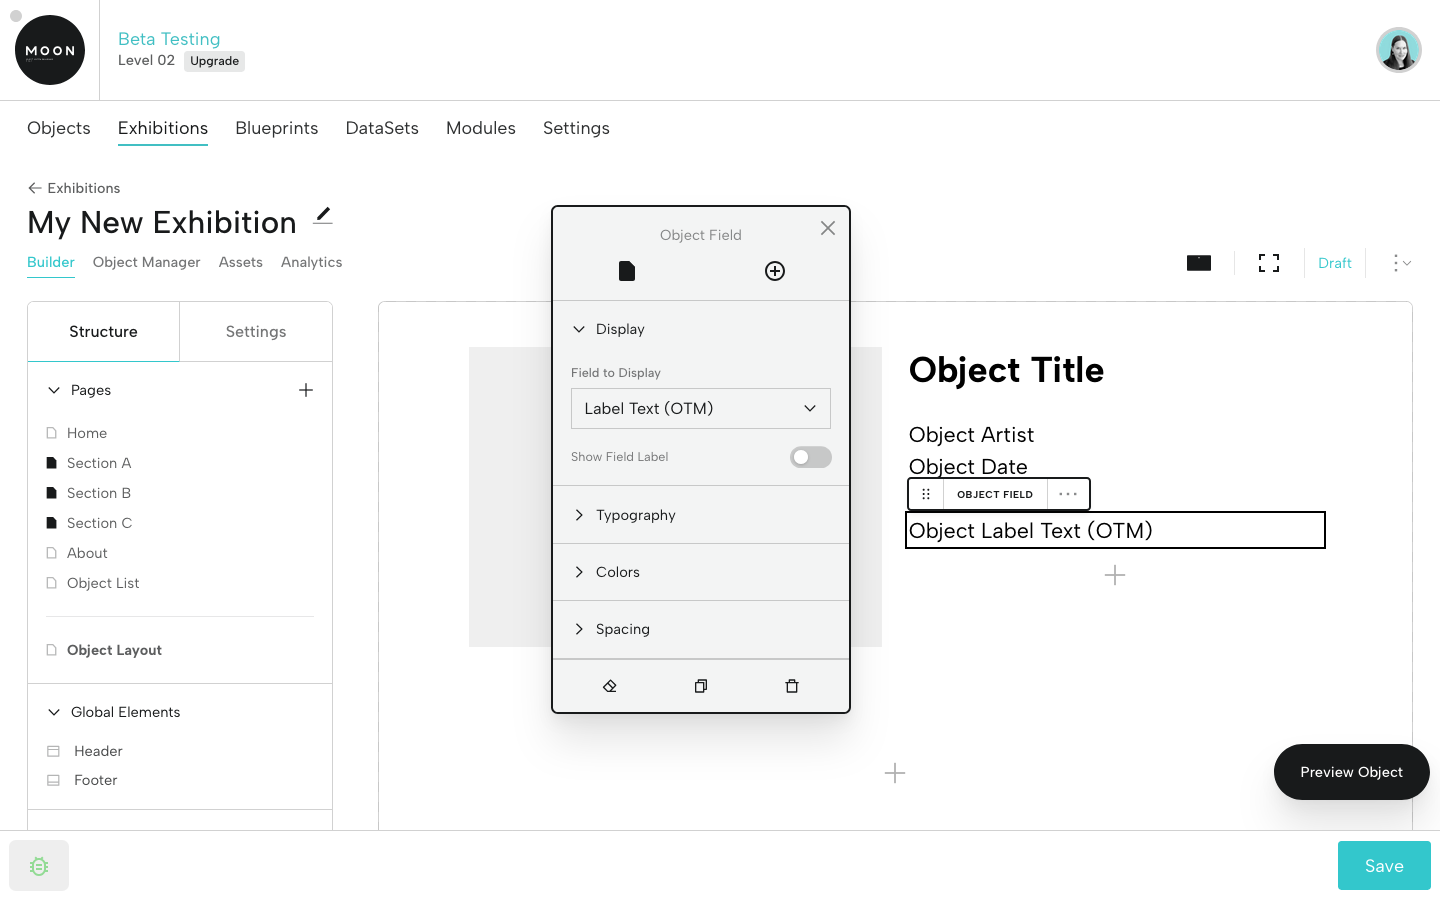
A. Click one of the Object Fields (Object Artist, Object Date, etc.). This will open the Universal Editor. You can decide whether or not you want show the Field Label (for example, the word "Artist" or "Date"), and you can make updates to Typography, Colors, and Spacing.
B. Add a new Object Field by clicking the + icon below. Select Object Field. This will bring up the Universal Editor where you can select a new field for display. The fields you see are generated by the Over the Moon Exhibition Blueprint.
C. Let’s add Label Text (OTM). In the Universal Editor, go to Spacing and drag Top Margin all the way to the right, to Extra Large. This will add space between the tombstone information and label text.
D. Now click the lowestmost + on the page. Select Object Field and then Additional Images (OTM). When you view an individual object, if the assets exist, they’ll be displayed.
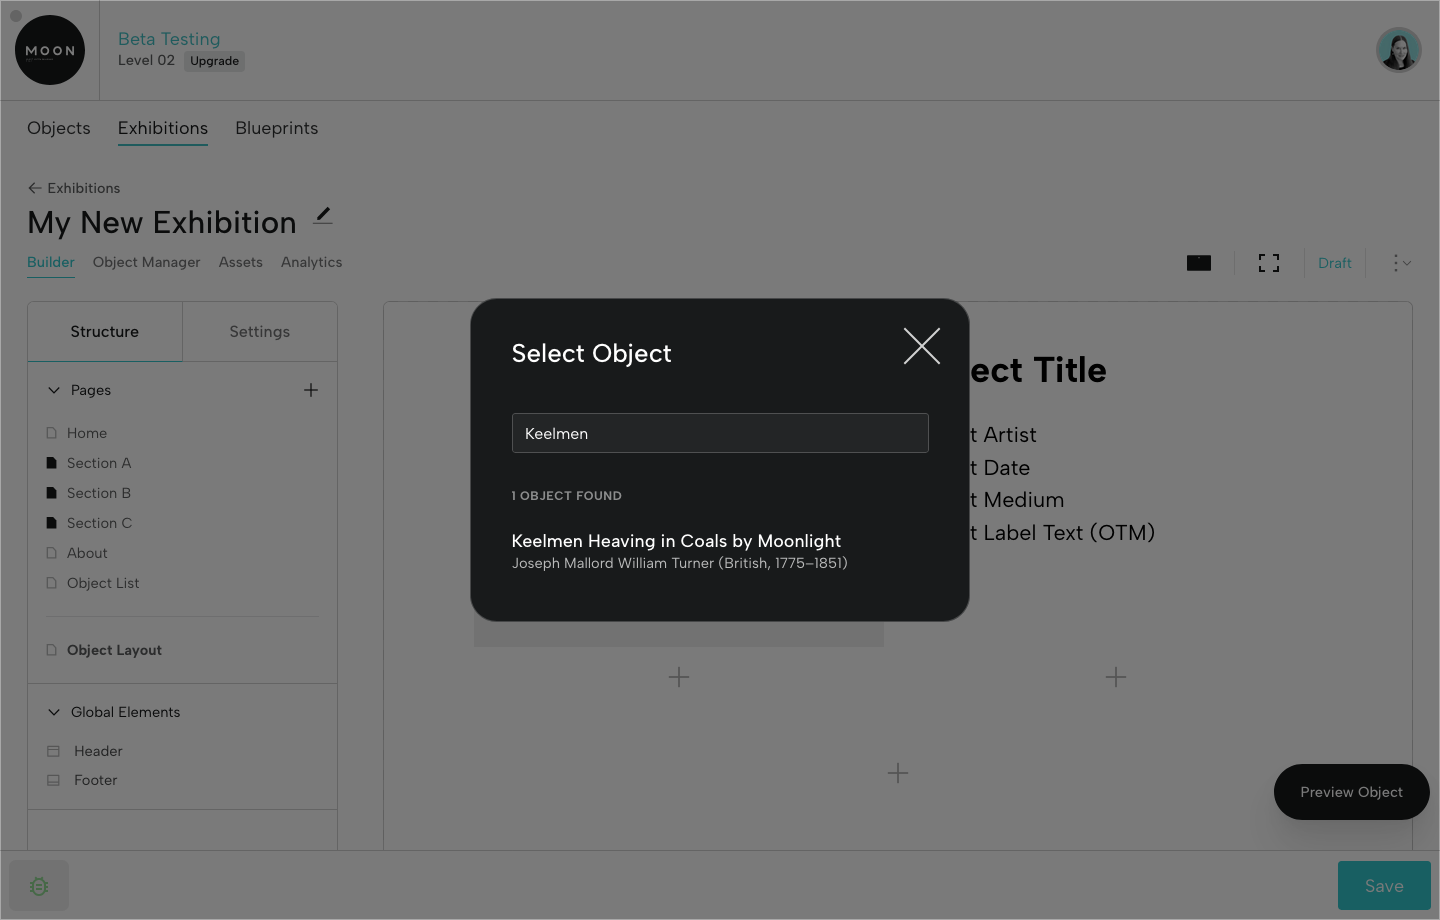
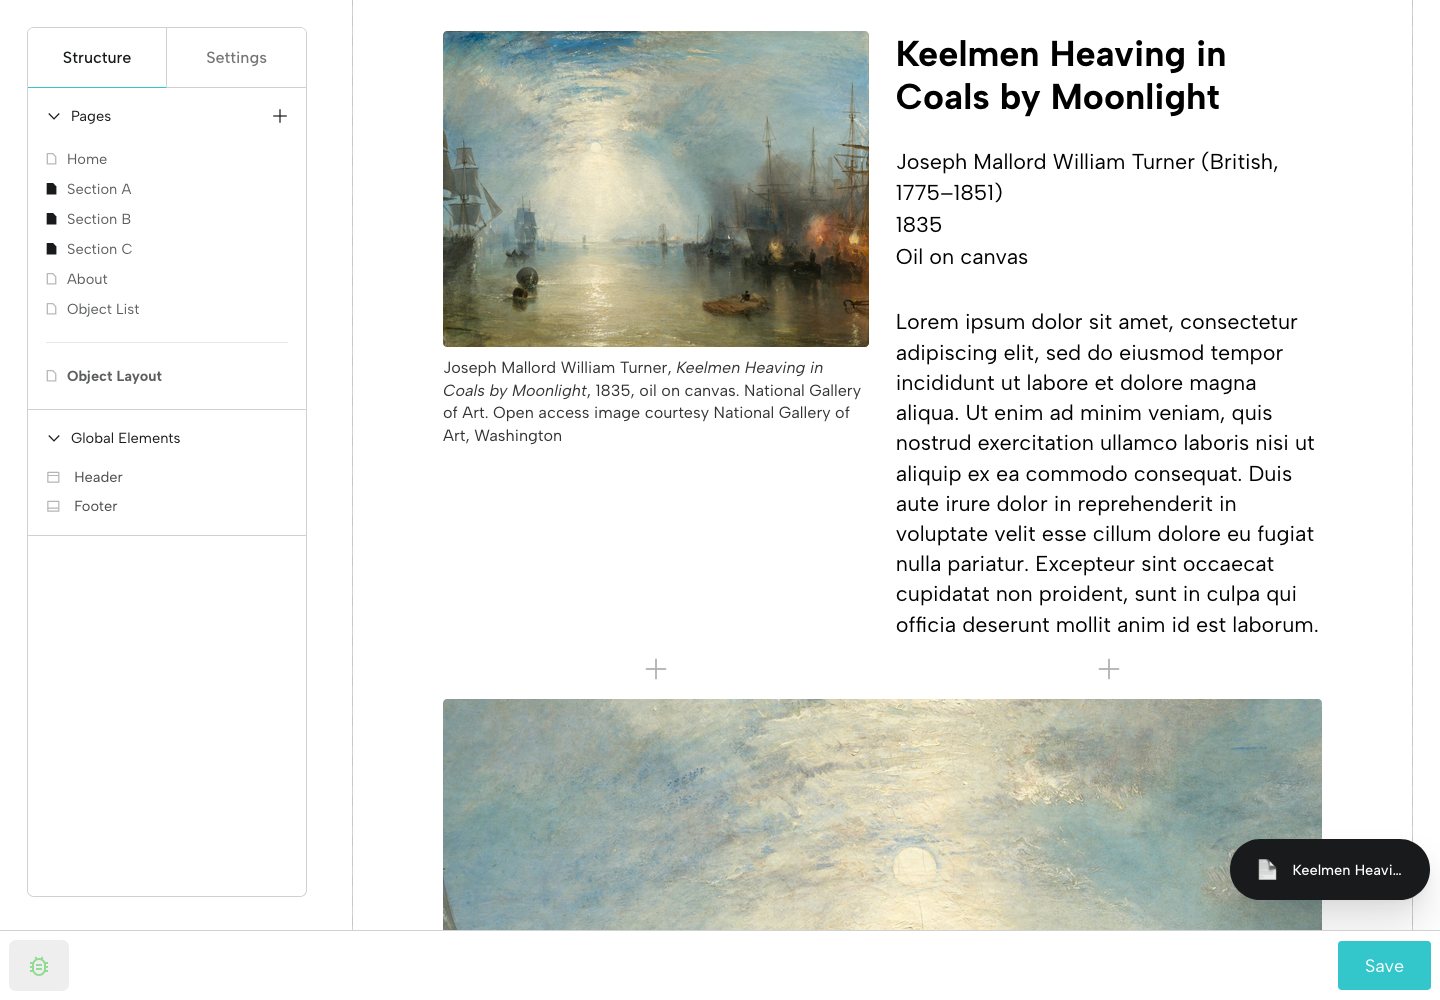
E. To preview what it will look like when you view an object in the exhibition, click Preview Object in the lower right hand corner. Let’s search Keelmen and choose Keelmen Heaving in Coals by Moonlight.
When you preview an object, you’ll see the primary image, data, and any additional images.
Step 9: Set Up the Header and Footer
Update the Header and Footer for your exhibition in Global Elements (under the Structure tab).
A. Click Header and the Universal Editor will open.
B. Start by deciding your preferred Layout.
C. You can also update Typography, adjust Spacing, and choose Colors.
D. Does your exhibition have a graphic title treatment that functions as a project logo? You can add it in Title Image. Once added, this will appear in your Assets.
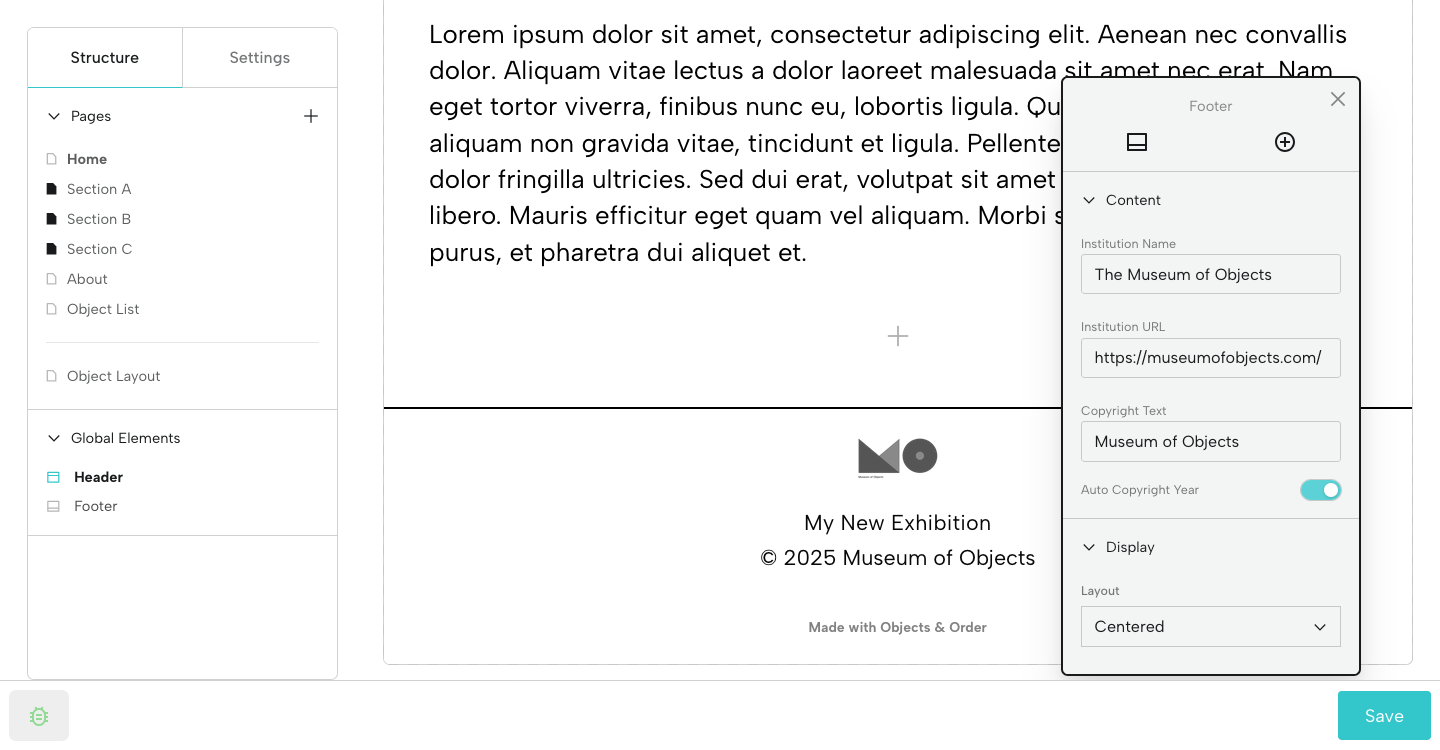
E. Click Footer (or just click the Footer area in the Viewer) and the Universal Editor will change.
F. Add your Institution Name (if applicable), URL, and text for the copyright statement. You can also add an Institution Logo.
G. Adjust your Display, Spacing, Typography, and Colors.
PLEASE NOTE: Your Header and Footer will appear on every page of your Exhibition. If you do not wish them to display on any page, go to Settings, then Display, and toggle off Show Header and/or Show Footer.
Step 10: Set Up Your Section Pages
In the Structure tab, under Pages, click one of your titles.
When you assign objects to a section using the Object Manager, object images will automatically appear on that section page in a grid format. Click the grid of images and the Universal Editor will pop up.
A. In Display, select the preferred Display Mode: Grid view, List view, or Carousel view.
B. For Grid view, you can add reduce or expand the number of columns by using the dragger. Here we've selected 3 columns.
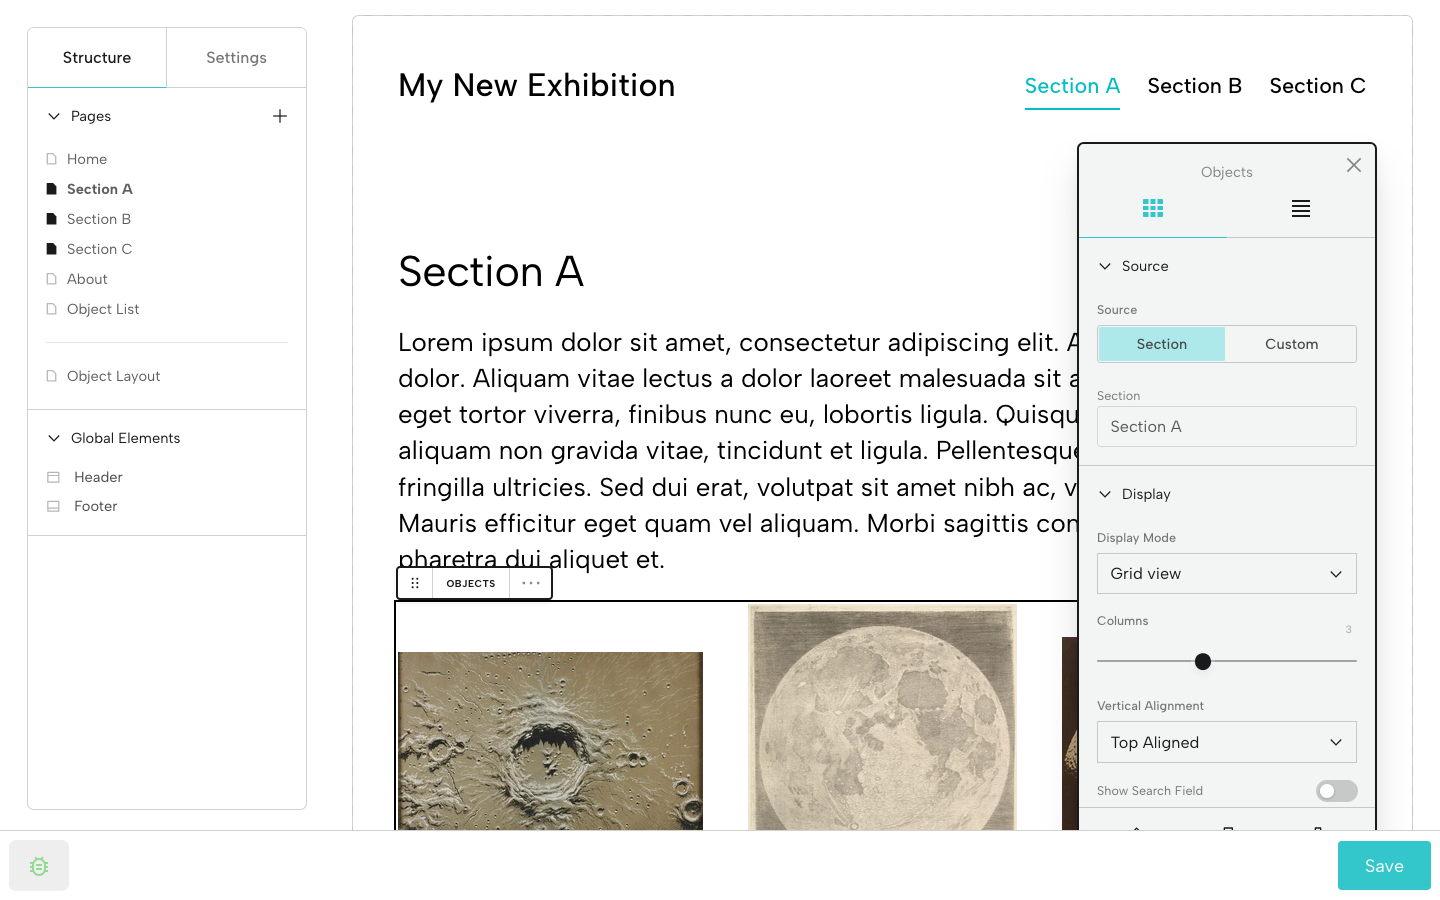
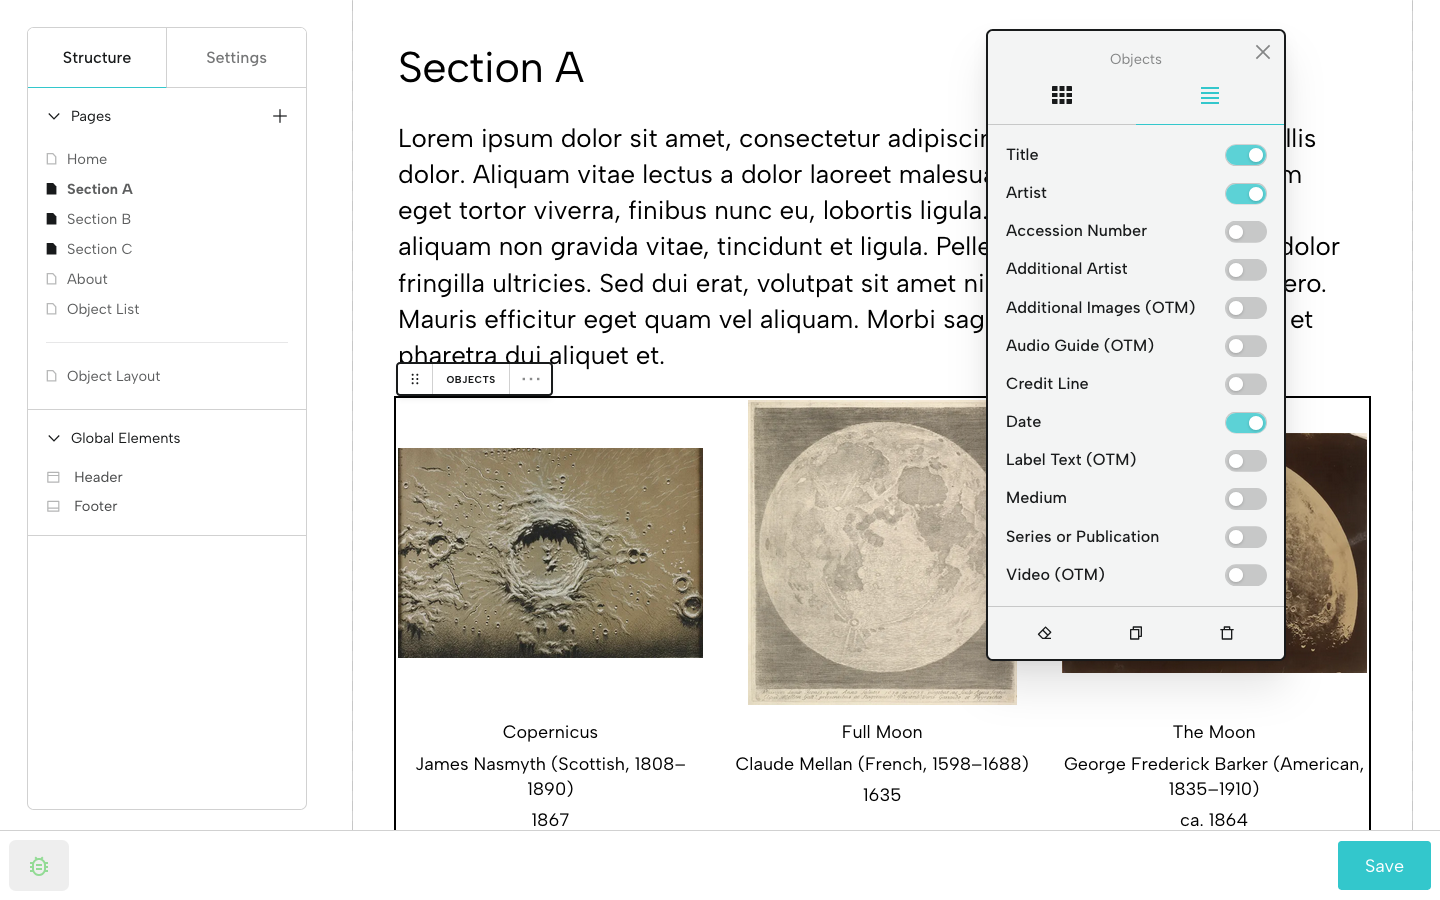
C. Now click the Fields tab (icon with 4 lines near the top of the Universal Editor). You’ll be able to toggle on the information you want to display below each image. Drag and drop to reorder. The field options you see are generated by the Over the Moon Exhibition Blueprint.
Remember to Save as you update pages.
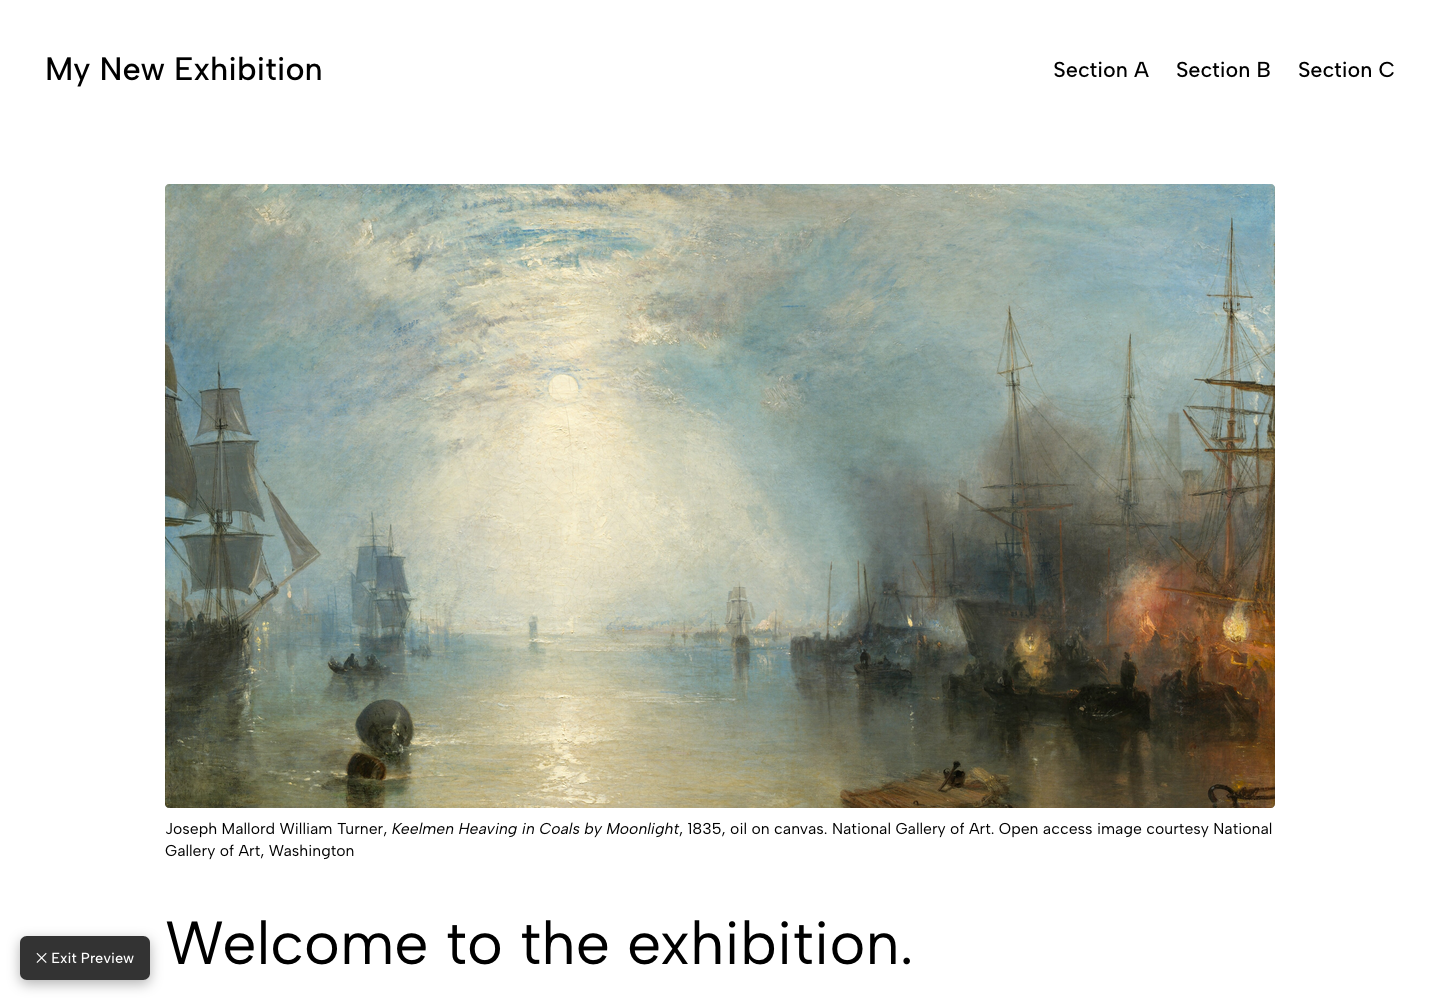
Step 11: View Your Exhibition in Preview Mode
After you’ve updated and styled the pages in your sample exhibition, turn on Preview Mode to explore a full-screen, interactive version of the exhibition.
Click Exit Preview in the lower left-hand corner to exit Preview Mode.
Tip: When previewing, don't use the back button in your web browser; navigate using the menu items, options, and links within the exhibition.
Step 12: Experiment Away!
Add new pages, add blocks, add text, change colors, fonts, and layouts. Explore and experiment. Don’t be afraid to move things around. This is your testing space.
Create new exhibitions. You might even create your own Exhibition Blueprint with your preferred fields for the sample objects. For more on Blueprints, see The Art of the Blueprint.
Let us know if you have any questions, if you get stuck, or if you’d like a quick demo. Remember, you can reach us from this guide by clicking the blue Get in touch tab, or just send along an email.
Please Note: To add files to Assets, you’ll need to verify your email address in your Account (circular icon in the upper right-hand corner).
Step 13: Create Your Own Exhibitions (Optional)
If you want to try creating your own exhibition project, structuring your own exhibition Blueprint, and adding your own objects during the beta testing or preview period, go to the MOON Dashboard.
If you don’t have your own Base yet, you can create one and add up to 100 objects (no cost, no credit card required).
Please Note: To add Files to Objects (and Assets to an Exhibition), you’ll need to verify your email address in your Account.
PLEASE NOTE: IF YOU CREATE A PERSONAL EXHIBITION PROJECT IN YOUR OWN BASE, IT MAY NOT DISPLAY PROPERLY LATER AS UPDATES ARE MADE IN PREPARATION FOR LAUNCH.
Step 14: Publishing
What about publishing a sample exhibition? You may have noticed the Publish option in the menu at right. We haven’t activated publishing yet.
Troubleshooting
Is something not loading or displaying properly? Try refreshing your screen.
If you encounter a bug, please contact us from within the system by clicking the green bug icon in the lower left-hand corner. This will automatically open a Bug Report wherein you can describe the issue.
Thank you for helping us squash bugs! 🪲
If you want to learn more about other aspects of our object system, check out our other Guides.
Digital Exhibitions Glossary
Assets: Files related to the exhibition (for example, a title graphic, a map, or an artist’s portrait)
Analytics: Exhibition analytics (coming soon!)
Base: Collaborative space for managing object data and media files and for creating digital content like exhibitions and modules
Block: A type of component you can add to a page, the header or footer, or to a container Block (text, image, video, link, etc.)
Block Bar: Appears when you click a block; it allows you drag the block, see your block type, and add, duplicate, and delete the block
Blueprint: Customizable, purpose-built forms with fields for object information
Builder: Comprised of the Editor, for pages, global elements, and settings (left); and the Viewer, for viewing and updating exhibition content (right)
Container Block: Block type that accommodates other blocks within it
Exhibition Metadata: Data about the exhibition and the individual pages that becomes available when the exhibition is published
File Metadata: Data about an object image, video, or audio file, including caption, alt text, and rights information
Global Elements: Site elements that display on every single page (Header and Footer)
Metadata: See Exhibition Metadata or File Metadata
Object Manager: Where you sort your objects into exhibition sections
Preview Mode: Preview a full-screen, interactive version of the exhibition (turns off editing capabilities)
Universal Editor: Floating, moveable editor for updating pages, blocks, and the header and footer